Tuesday, November 25, 2014

BeFunky - More Editing Fun!

Photo Elements always has been and I imagine always will be my photo editor of choice. It's a great all around program.  But just for kicks I started playing around with the free online version of BeFunky.  It's great fun if you just want to do something quick with some pretty fun effects.  Here's a before & after shot I took at the Good Guys Car Show in Puyallup a couple of years ago.

Before

After

To get this vintage, old time kind of feel I used the following effects in varying degrees:
  • Beautify
  • Soften
  • Focus Blur
  • Tilt-Shift 2
  • Old Photo 13
  • Summer 1
  • Vignette
I'm the first to admit that I can get a little carried away.  I probably didn't need to actually dabble with quite so many effects for one shot, but hey - it's fun!  And right now it's all about experimenting.

Wednesday, November 19, 2014

Let's Play!

Dang!  I've really fallen behind with my grand scheme of posting once a week!  Life is getting in the way, but fortunately I'm still taking the time to use my camera, learn more and play around with editing.  Just for fun I grabbed this not-so-great (well actually really bad) shot of my grandson fooling around last year.  (Which goes to show I also haven't been very good about weeding out the non-keepers and staying organized!!)

Anyway...  lousy shot, bad lighting, out of focus and frankly not his most flattering pose...

Before

...but dink around, adjust the lighting, play with a few filters, add a fun frame and I now have a nostalgic image with a completely different feel - one that makes me laugh every time I look at it.   Makes me think of Alfalfa from the old "Our Gang" TV series.  :)

After

Not a tutorial.  Just sharing some fun I had and hopefully encouraging some of you to get in there and experiment too!

Friday, August 22, 2014

Another Attempt at the "Orton Effect"

I was just itching to try this again.  This time I used a shot of some old typewriters I took in Molson (a very cool ghost town in Washington state).

Here is the original  image straight out of the camera:


And after editing, using only the PSE guided "Orton Effect" and then adding a soft dark edge:

I'm loving this!  Can't wait to do more!!

So after investigating a bit on the internet, it looks like the guided "Orton Effect" was added with PSE version 10.   I did however find lots of tutorials showing how to manually create the same effect in either Photoshop or PSE, all of which looked fairly simple.  I plan to try some of them out to see how they compare to the effect provided in 10 & above (I'm currently using version 11).

Wednesday, August 20, 2014

The Orton Effect


In PS Elements 11 (and probably in other versions as well) there is something called the "Orton Effect".  It can be found under the "Guided" tab and then "Photo Effects".  In my effort to learn more and try new things, I thought I'd give it a go.


Since flowers seem like a natural subject to use a "soft, dreamy" effect on, I chose this shot I took of a lovely bouquet from a friend. (Thanks Joyce! And to think every one of these came out of her own yard!)


So I've never tried this before and since I'm usually trying to get crisp, sharp images it feels a little wrong to intentionally set about blurring a shot... but here we go...


Looking at a close up section of the before and after, my gut tells me I've absolutely ruined it! But when I look at the overall effect on the whole image and I kind of like it.


This may not be a prize winner, but keep in mind it was a first attempt..  If you don't like what you see here, please don't let it discourage you from trying it out for yourself. I'm sure there is a bevy of info out there on the web for using this technique and trust me,  I intend to take advantage of it.  I think with a little practice and maybe using multiple layers this could be a pretty cool tool.

What do you think?  If you've got experience or tips to share please leave a comment.  I'd love to hear from you.

Saturday, August 9, 2014

A Tad Bit of Editing

In my last blog entry (July 26), I showed 6 examples of the same shot taken using different camera modes.  I don't normally do much with black & white and maybe that's why my eye was drawn to one of those over the color shots.  At any rate this is the one I gravitated towards and threw into PS Elements.

I really didn't do all that much.  First the basics - adjusted "levels" and "brightness".  Then went to the "Filter Gallery" and applied a a small amount of the "Paint Daubs" and the very minimum of the "Poster Edges" filters. Since it's hard to see what the filters really accomplish, I'll include a couple of close-ups for comparison.


Above is the original.  It would've been fine with just a levels adjustment, but since I like to play, I continued on.  I liked the combination of the 2 filters which resulted in a crisper, more defined image (below).


On a side note, I shot this as experimentation.  I'd normally never shoot using the camera's black & white mode.  My theory being that I can always take a color shot and later convert it to b&w, but I'd have a dickens of a time trying to do that in reverse!

Saturday, July 26, 2014

Using Different Camera Modes

Holy Moly!  Sometime back I made it my goal to post on my blog once a week - at a minimum. Well my last post was in April, so I'm obviously failing miserably.  Daily life has got in the way of blogging, but luckily it has not taken me away from my camera. I've been snapping away like crazy.

Recently I've been trying to experiment and learn more using different camera settings.  I've been using my manual settings more, but I've also been trying out the various auto modes.  I took these shots of some lovely yellow glads my hubby brought me.  I put the camera on a tripod, placed the vase of flowers in front of my black fridge - no surprise there if you've read my previous posts! ;) - and proceeded to shoot the same scene using different shooting modes.

Different Camera Settings

I won't go into detail about the exact modes used because all cameras are different. But even if you're using a point & shoot, it most likely has lots of options to choose from.  My goal is simply to encourage you to try them out and see what you get.  

The above are samples from images straight out of the camera.  No editing.  Or I should say, no editing yet!  My next post will be one of these images after I run it through Elements and have my way with it.  Yee Haw!

Friday, April 18, 2014

Resizing Images

We've all received that photo in an email where a huge, hairy nostril (or some such thing) is staring back at us. Very irritating.  Worse yet, are you the guilty party who might be sending these gargantuan files?

Today's cameras are capable of giving us wonderfully, huge images which are great for printing. However any image that you plan to show on the screen, be it email or posting on a website, can be reduced to a fraction of the original file size and still show beautifully.  The human eye will never know the difference and it will also load in a fraction of the time.

I've been resizing images forever and it really hadn't occurred to me to do a "How To" on the subject.  However thinking back, this is probably the number one thing people have asked me to show them.  Pretty basic stuff, but if you're new to photo editing it's definitely something you need to know.

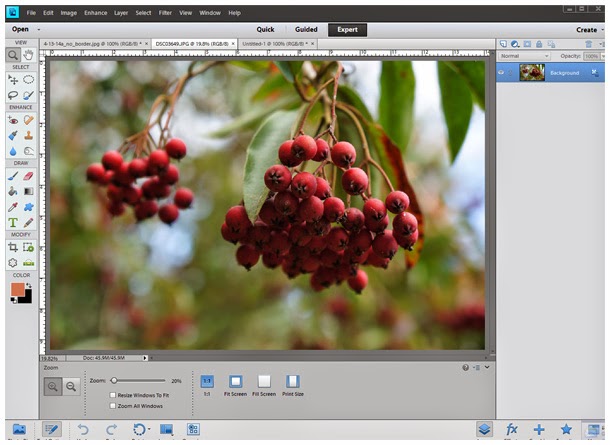
If you've read my previous posts you know that I'm using Photoshop Elements and that I never, never, never recommend altering your original image.  The first thing I always do after opening an image in Elements is go to "File" - "Duplicate".  Then close and put your original away for safe keeping.  OK, so now you've got a full size, duplicated image on your screen. Let's get started...

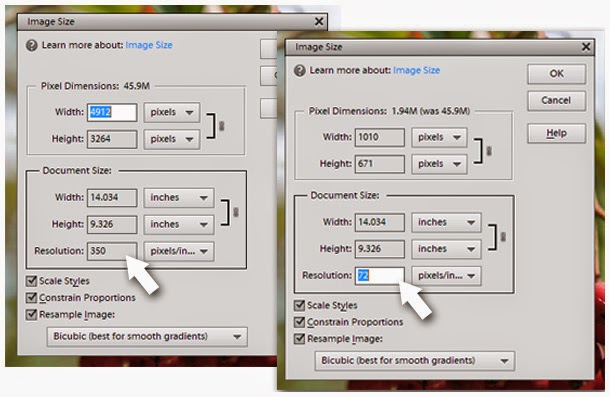
Above is my original (duplicated) image straight out of the camera.  It's a 2.87 MB file measuring 4912 x 3264 pixels - or roughly a 14 x 9" image at 350 ppi (pixels per inch).  Note -it's not legible in the above screen shot, but in the snippet below you can see that in order to fit the entire image in my work area it automatically opened at less than 20% (right above where the "image size" dialog box is). More on this later.

The fact that it's 350 ppi means that it is going to be MUCH larger on the screen than the 14 x 9" since screen resolution is more along the lines of 72 or 96 ppi.
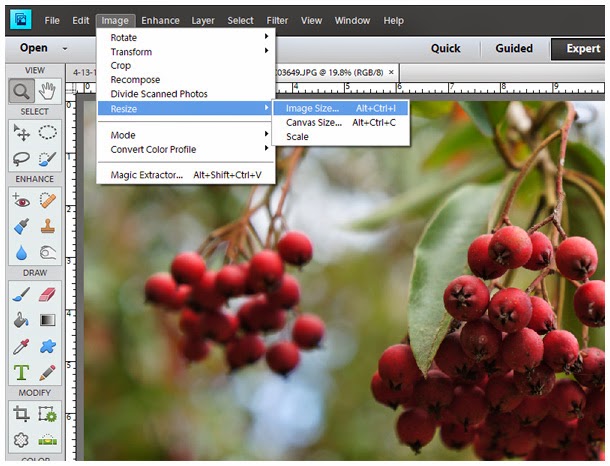

Now go to "Image", select "Resize" and then "Image Size".  


On the left is the dialog box that opens showing my current file information.  Make sure that all 3 check boxes are checked.  Then on the right you can see what happens when changing the resolution from 350 to 72 (standard resolution for website viewing). The width & height have been reduced drastically as it pertains to pixels, yet our actual document size in inches remains the same.  In other words, we have just reduced the file size dramatically, but you've now got an image that will display correctly at approximately 14 x 9" (or whatever your original started out as). This is still a pretty big image for most purposes, so you may want to take it a step further.
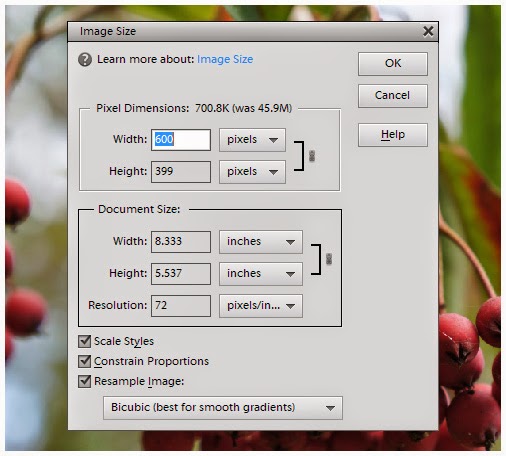
Keeping all the boxes checked, go up to the pixel dimensions. Since we have "Constrain Proportions" checked, it will only be necessary to change either the width or the height. The other will adjust automatically.  At 72 ppi, a width of 600 px's gives us an image that will display at approximately 8 x 5".  Or you may want to go 800 px's wide or whatever.  My point being that something in this range is a much more manageable size to send via email, especially if you're sending multiple images.  It's also plenty big for posting to facebook*, etc.  So decide on a size and hit "OK".
*If you're a facebook junkie, please read the comments section at the bottom of this post for an update to this info.
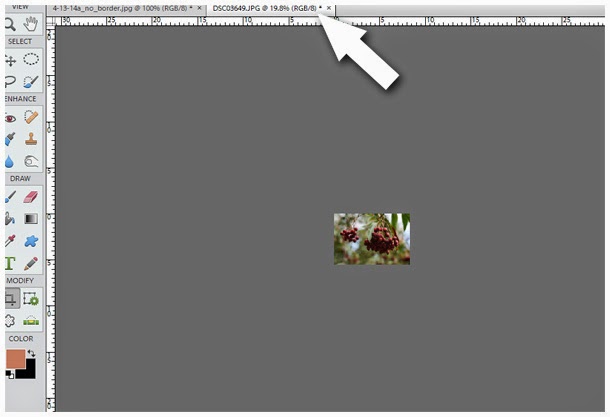

And WHOOPS!  You now see a tiny, barely recognizable, little image.  Before you start cursing at me, note that Elements is still displaying your image at less than 20%.  This pretty well illustrates just how much you have reduced the file size.  To now see your image at the true size you have reduced it to, simply grab your zoom tool and increase the image to 100%.  
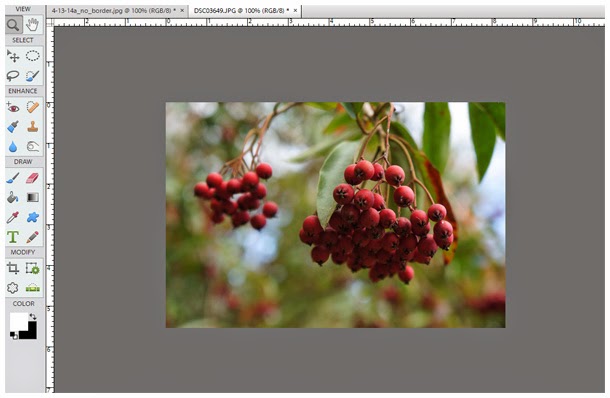
Voila! At 100% my image is now displaying on the screen at that approximate size of 8 x 5" that I had chose.  It's worth noting here that once your image is displayed on the web, the size will appear slightly different on different monitors. This is due to the fact that monitors come in and can be set at different resolutions.  Not to worry - regardless you now have an image that is not obnoxiously large.

Now rather than doing a "File" - "Save" or "Save As", I select "File" - "Save for Web".
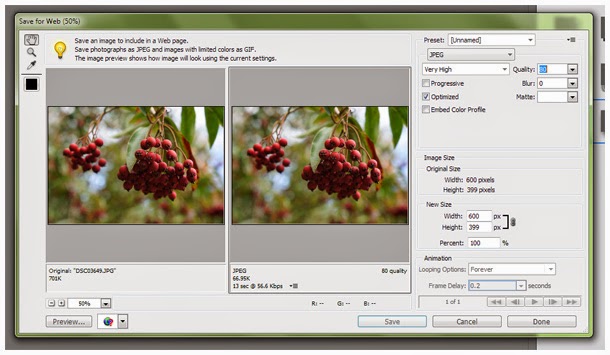
The above dialog box will open giving you the option to set the quality.  I find that a JPEG set at anything around 80% or above is excellent.  This "Save for Web" step further optimizes your image for the web and removes some of the file information.  The viewing dimensions remain the same, but your file size has been reduced even further, making loading just that much faster.
Whew!  For something I consider pretty basic information, this just might be my longest post yet - and I still don't know that I've explained it all that well.  If you've got any questions please leave them via a comment and I'll do my best to respond.

Saturday, April 12, 2014

Are You Trigger Happy?

"... it's a Camera, not a Machine Gun!"


This is one of the best bits of photography advice I've come across lately.  It was tip #10 in a recent Digital Photography School website feature - "Ten Quick and Easy Tips to Improve Your Photography"*.


"Unless you are taking action shots or a time lapse series, try to reduce the number of shots.  Don't just fire away hoping for something good to appear during editing.  Think, move and adjust your framing before you click the shutter.  You'll develop better instincts and save hours of time editing those hundreds of extra images."


I truly do believe this is a great tip to "develop better instincts", but I have to confess it was "save hours of time editing those hundreds of extra images" that really hit home for me.  I'm definitely going to keep this in mind and hopefully will get the added bonus of both results!

*The DPS article was written by Amar Ramesh.  You can see some great examples of his photography on  his facebook page.  I especially like his shots of people.


Saturday, March 29, 2014

Lens Hoods - Everything We Need to Know

Just a quick post to share an excellent video that popped up on facebook via DPS (Digital Photography School).  I had searched high and low for this info on the internet a while back and came up empty.  Then up pops this WONDERFUL video link on facebook.

Lens Hood Video

I was doing a happy dance just to find out that most lens hoods are reversible - on the camera - for storage!  OMG!!!  All this time I've been removing mine and dangling it from the snap on my camera case.  I actually paused the video, went and grabbed my camera to give it a try.  Sure enough! 

Of course the information I was really after was why to use one style of hood over the other (since my camera came with both, but with no explanation).  And this video explains it all. Thank you DPS!!!

By the way, I have barely tapped the surface of this newly found resource of mine, but it appears to be a great place to get all kinds of tips.  If you're not already tuned into it, here are the links:


Wednesday, March 12, 2014

Yipee! A BetterPhoto "Editor's Pick"

I just came in from my mid-afternoon break -walking the dogs in this glorious thing called 'sunshine'!- to discover that a recent entry I'd submitted to BetterPhoto.com, was awarded an "Editor's Pick".  The return of sunshine had already made my day, but this is the frosting on the cake!  WooHoo!!

Amaryllis Close-Up

Now that I'm done patting myself on the back, I'd like to show that this is an example of what you can often find in one of your ho-hum, not so terrific shots.  Before you discard an image take a second look and see if there might be a better image within the image.  Here is my original shot:


Obviously I'd made some lighting adjustments as well as the cropping.  The original wasn't all that bad, but after looking at it I really wanted to focus on the long swoop of the stamen.

So now with a smile on my face, I shall return to the ho-hum day job.  If I look hard enough maybe I can find a bit of frosting there as well!  Like it pays the bills, provides the medical, blah, blah, blah... ;)


Monday, February 24, 2014

In Camera Panoramas

Panoramas - Something I know next to nothing about, but I'm working on changing that.

Like lots of digital cameras, my Canon Elph compact has something called "stitch assist", which I've never had much luck with.  However in all fairness, I've not really spent any decent amount of time at it.  I just kind of played with it a time or two, didn't get any great results and moved on.  (Apparently I sometimes have a short attention span.)  Anyway my point is, it just might be a dandy little feature if I'd only give it a bit of a chance.

My Sony Nex5N has something called "sweep panorama".  Even though my love affair with this camera began more than a year ago, I'd never bothered to use it.  So while vacationing in Hawaii recently I decided to give it a go.  My first attempt was overlooking the Halemaumau Crater.  I carefully steadied the camera as I panned slowly from left to right.  I made several attempts - each time getting a nasty-gram from my beloved Sony - a horrible beeping noise with the message "move the camera from left to right".  Well dammit!  What did it think I was doing?!  I consult the help menu and again I'm told "move the camera from left to right".  After briefly questioning my abilities to know my left from my right, I set out to try again.  Well it just so happens that next to me some young 'fella with his smarty-pants phone is panning and he's just going lickety-split.  And it worked!  So I throw myself into 'overdrive' and finally my camera captures an image.  It turns out I was just underestimating technology and my camera was just wanting me to pick up the pace.

Now you can see above, this first attempt is not a roaring success.
It's very clear that I wasn't steady enough for the camera to match up the segments.

So I give it another try, moving quickly but steadier and tackling a little smaller area.
Not too bad.

A couple of days later while heading to the beach, I decided to try it again.
This time I got several decent panoramas and was able to pan a bit wider distance.  Success!

Of course by then I'm feeling pretty smug and decide I'll test things out going vertical instead of horizontal.  Well guess what?  No matter how many times I tried  - and at various speeds - I wasn't able to get one stink'n shot.  Not even a messy, zig-zag one like my first example...  Ah well, something for another day.

Friday, February 14, 2014

Happy Valentine's Day!

In honor of the day I thought I'd share one of my favorite red rose images.  However in uploading this to the blog, I have discovered that for whatever reason, the upload degrades this artsy-edited picture horribly.


To see the real deal, please visit my gallery: Red Rose

P.S.  This is my first irritating moment with "Blogger".   Grrrrrrr....

Thursday, February 13, 2014

Photography & Refrigerators - Huh??


What in the world does a refrigerator have to do with photography??  Not much unless you're an amateur photographer like myself - one without any fancy props or backgrounds. My kitchen appliances happen to be black, so placing flowers in front of the fridge works quite nicely.

Black Backgrounds

There.  We just discovered something that the oh-so-popular stainless steel numbers don't excel at. Hah!! ;)

Sunday, February 9, 2014

Metal Prints

Last fall I shared a Groupon link for metal prints.  I don't know if any of you took advantage of it, but I finally got around to redeeming mine and I'm pretty thrilled with the results.  I've done several prints on canvas which I've been happy with, but this is a whole different look - really crisp & vibrant.

I don't know where I'm going to put these yet, but here's a quick peek.  (This shot doesn't quite do them justice.)


Normal price on these things isn't exactly cheap, but I just checked to see what Groupon is currently offering.  If you're interested,  follow this link:  Groupon Offers for Metal Prints .  As of today they show 3 different offers.

Tip - You want to make sure to use a high resolution, very clear image.  Canvas prints can be somewhat forgiving, but not these.  

Saturday, February 1, 2014

Aloha!

"Aloha" from the big island of Hawaii.  I've been here for a week and taken somewhere around 1,000 pictures (more on that later).  We had rain one day and so we killed some time shopping.  I was disappointed that it wasn't a good 'camera day', but ended up making a great discovery instead.  We stumbled across a gallery that I didn't know existed, but I'll be keeping track of it from now on. Check these guys out if you want to see some amazing photography!


Lava Light Galleries

The website doesn't quite give you the same feeling as when you're actually standing in front of these amazing images, but definitely spend some time exploring their site.  These guys do amazing (and somewhat terrifying) things - from swimming with sharks to dodging red hot lava.  And they capture it all beautifully.

If you get the opportunity to visit one of their galleries, it's well worth the time.  CJ (one of the photographers) was at the gallery when we were there and spent all kinds of time telling us about his experiences.  I only wish I could have stayed longer!

They also have a facebook page.  Just search for Lava Light Galleries and you'll find them.

Wednesday, January 22, 2014

Busy, busy, busy...

I haven't forgotten about my blog and I'm dying to get back to it...  Busy holiday time, busy at the day job, busy with the side job... excuses, excuses...  "Sony" (yes, I talk about my camera like it's a  friend) & I are getting ready to head for the tropics.  So I don't know what I'll be blogging about next, but it's bound to involve a palm tree or a beach or something!... See ya soon!  :)