Here's a quick tip using one of my favorite PSE filters... and by favorite I mean I use it quite frequently - but only in moderation. I haven't yet found a use for it in it's full blown 'go-for-it' mode, although please consider that a challenge if you like.
On the left is a section of my original photograph as it came out of the camera. On the right is an example showing the defined edges for a crisper look. (We could debate as to whether or not that's a desirable look for this particular photo, but let's just assume that's the look we're going for.) So find a good image of your own that feels like it might just need a little extra 'punch' and we'll go through the steps...
Obviously if you've been reading my previous posts, you are working from a copy and before you make any modifications to the copy, you've made a duplicate background layer.
No? Go ahead and refer back to the
November posts. I'm not going anywhere! ;) Also please note that if your image needs any basic adjustments you'll probably want to take care of those first. For instance you might want to do your
levels adjustment. Once you're happy with your adjustments go ahead and flatten the image ("Layer" - "Flatten Image") and then make a duplicate layer of your now enhanced image. OK, let go...
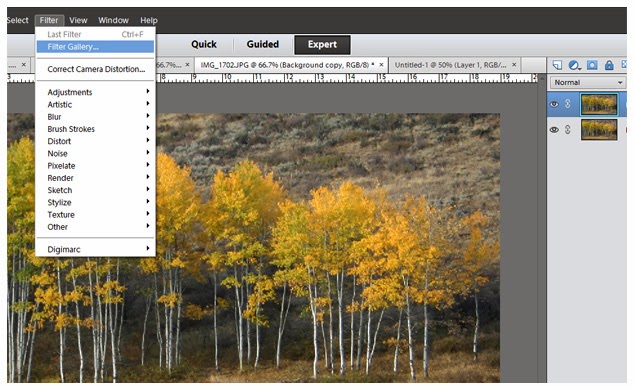
This is super simple and can really add a lot to the right photograph. Making sure you have your duplicate background layer highlighted (the one on top), go to "Filter" in the menu bar and then select "Filter Gallery".
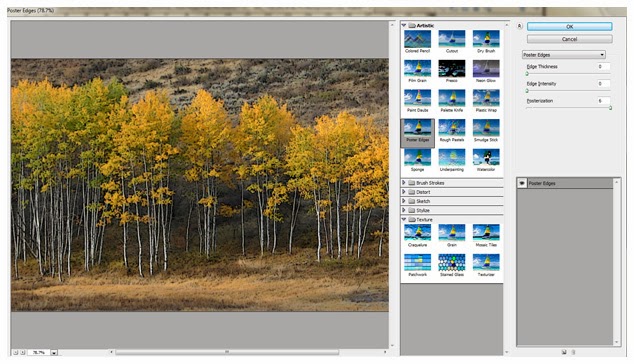
Elements will open up a new screen for the "filter gallery". You'll have lots of choices to play with here, but for now pick "Poster Edges" under "Artistic".
Once you select "Poster Edges" you'll see that it gives you some options off to the right. Even though I have "Edge Thickness" and "Edge Intensity" set at "0", it will still give me a bit of an edge. Play around and move all 3 sliders back and forth to see what it does to your image. Quite honestly, this "0-0-6" configuration is what I most often use, occasionally pushing out of my comfort zone with a big, scary "1" for either thickness or intensity.
You have the eyeball icon here, just like on the layers panel. Works the same way - click on, click off to see your image with or without the filter you've applied.
This would probably be a good time to mention that the size/resolution of your image will have a big impact on the effect your get when applying any of the artistic photo filters . If you're working with a large file at 300 dpi, you're going to see far less impact than if you've working with a smaller file at 72 dpi. I recommend that you make all of your adjustments on a larger file, which can then be sized down after you've tweaked it to your liking and flattened the file. (Let's say you start going crazy on a small file and then decide you've created a masterpiece, which you're now thinking might make kind of a cool poster size print... well guess again.)
So off my soapbox and back to the task at hand... You've now tweaked the "Poster Edges" settings to your liking or something close. Go ahead and hit "OK". The gallery will close and put you back on your main PSE screen with your newly modified image.
Since your artistic filter has only been applied to your top layer, if you decide it's a little strong you can grab the "Opacity" bar (just like we did when
adjusting levels). Dial it down a bit and some of your original image will start to show through, lessening the effect of the "Poster Edges".
That's it! Sometimes you won't like the effect at all. (Remember "Undo" is probably the most used tool in our 'Beginner's Toolbox'.) There are times I find it does the trick, especially if my shot just isn't quite as sharp as I'd wanted. In the image above I happen to like the way it adds to the detail of the tree bark and gives some definition to the leaves.
How or if you use it is all a matter of personal preference. But it's an option and one you might find useful at times.


